

Coaching | Teaching | Experimenting | Learning | Sharing | 1:1 | Macbook & iPad
Friday, December 5, 2014
Sunday, August 31, 2014
Presentation Tips - keep it simple
Pretty amazing and nailing it down! Most presentations show too much, go to deep,
and do not satisfy the audience (your customers!).
In fact, you are giving them a burdon to take along!
Helps you to keep it all simple, and be more effective!
(Made by the people at Ethos3)

Wednesday, August 6, 2014
Transfer music from an iDevice back to a Macbook (or laptop)
iTunes will allow you to get Music from your Macbook to your iDevice, such as your iPad.

Great! But now: how to get music of your iPad, back to (any) other laptop?
This way around is much more complicated. (Due to Apple's concern of illegal copying of music from those small devices).
There are quite a few software programs that can do the trick for you, but they all cost some money.
There is an option: use Senuti which allows to download up to a 1000 songs for free (during the 30 day trial). That will do in most cases, right!

It will ask a few details, basically where you will want your music to appear.
Just tried it, and it saved a few songs for me. Highly recommended!
Friday, May 30, 2014
Have Google Trends as a Screen saver (and some other RSS screen saver options)
This is basically a fun one:


Google tracks and monitors all searches that people perform, obvious!
They now have a nice graphical interface developed, that will show those latest Google search/trends.
and you can (try fullscreen!) display the trends, and even select a specific country.
Here is a recent - typical :-) - example for Canada:

You can - for Mac 10.9 + only - download a screensaver program, that will give you the same look and feel
as the website (the trends come in bright colors, and are 'typed')
TIP

Here is another Goodie:
If you would like to have your Mac display a certain RSS feed (like these Google trends, or news, or . . .)
in the screensaver, that is possible!
Go to your System Preferences, Screensaver, and then select RSS Visualizer:

Now you can add the RSS feed link into the options box (where it states 'Feed URL'):

Here are a few you could go for (source: Richard Byrne from http://www.freetech4teachers.com/ ):
Feeds directly related to education:
A Geeky Momma's Blog
Dangerously Irrelevant
iLearn Technology
Instructify
Larry Ferlazzo's Websites of the Day
Moving at the Speed of Creativity
The English Blog
Feeds targeted toward the tech early adopter audience:
Killer Startups
Mashable
The Official Google Blog
A Geeky Momma's Blog
Dangerously Irrelevant
iLearn Technology
Instructify
Larry Ferlazzo's Websites of the Day
Moving at the Speed of Creativity
The English Blog
Feeds targeted toward the tech early adopter audience:
Killer Startups
Mashable
The Official Google Blog
Or, maybe, just a fun one like this: Jumbo Joke – provides some great humour to brighten your day, or
Or, one that will keep you busy: Del.icio.us Hotlist – It gives you the websites that are getting the most attention/bookmarks on Delicious at the moment
Monday, May 26, 2014
Embedding Flickr Photos - as a slideshow - in your blog
Flickr has changed a few things. Apart from giving us 1 TeraByte free storage (which is awesome)


they made it harder to login (soon only Yahoo accounts will be possible. However, you can make one easily actually).
Another side effect: it's no longer an easy step to embed Flickr photo slides shows in your blog or on your website.
Well, there is always a solution:
Checkout
They make it possible again!
Just follow the prompts on their website. For an album to show, you would need to copy/paste the
album ID-number (formerly known as set) into the parameters. You can easily see that number in the
album URL (website address). It's a pretty long number (digits only)

After doing so, you will be presented with the embed code, for this album it would be:

You just paste this iFrame code into your blog post (choose text or html mode), and you will get
a beautiful slideshow with all (100 max.) images of the album.

Pretty easy, and slick for sure!
iPad and Macbook mirroring/display solutions
I sometimes get the question "how can I display/mirror my iPad/Phone and/or Macbook to my classroom projector?"
Luckily there are various options:
Use a Document Camera:
An obvious one, although sometimes forgotten! You could, if you have a stand, use your iPad for this,
it will show very decent footage actually.
Via a Cable:
The most direct and simple way: connect to the projector via an adapter on the VGA cable (some call that a dongle).

You can have them for iPad and Macbook, and they look different, depending on the age of the computer and projector.
The adapters connect to the VGA video cable (that connects to your wall plug/projector).
If you can use an HDMI adapter (check the projector), it will carry the audio as well. In that case, you might need to plug some amplified speakers into the projector (as those speakers are usually not very powerful).
Ask your tech department for a longer VGA connection cable, if you want to be a bit more mobile.
Wireless from iPad/Mac <-> Mac:
Apple uses the "AirPlay" wireless protocol, which is supported by a number of devices (iPad2 and higher).
Macbooks prior to 10.9 need some software to make them "Airplay" capable.
Reflector is such software that you run on your Mac, and it will allow any iPad in the network to connect to that Macbook.
You connect your Mac (as usual) to the projector. On your iPad you would use the "connect to airplay devices" option,
choose your Mac, and voila: you can show/mirror your iPad that way wireless on the projector.

And yes, you can set a password for the connection possibility, preventing that 'strangers' can connect to your Mac. Of course,
you might just want that, to allow any student in the classroom to display his iPad on the big screen!
That goes very fast, and allows a nice workflow, e.g. a student could easily show how he/she did the math equation to all . . .
Here is the bonus: Mac's with 10.9 (Maverick) installed, have Airplay features baked in. Meaning, they can connect to other Airplay
devices as well. Hence, that way one can connect iPads and Macbooks wireless to a class projector.
Here is the link: http://www.airsquirrels.com/reflector/ The latest version allows multiple connections (side-by-side) of more devices,
e.g. 2 iPads at the same time.
Has some very cool features like multiple iOS devices at the same time (comparing work, designs, both teacher and a student iPad at the same time, recording, etc.). It works pretty well, and there is no noticeable lagging.
And AirServer is a pretty good product as well: http://www.airserver.com/
Wireless from iPad/Mac <-> AppleTV:
Airplay connection is also a feature of the Apple TV's. You can (only) connect them with a HDMI cable to a projector (or TV/Monitor).
What does that give you?
* 10.9 Macs and iPads can connect to it (wireless) using Airplay. That way, you can wireless show and present.
* It can play video (+audio) from those devices, allowing a kiosk/display setup
* The Apple TV can play from sources such as Vimeo, Flickr etc. as well. It just needs WiFi connection for that.
Great for a classroom that has (a mix of) iPads and Macs. Anybody in the room could - instantaneous - show his device on the big screen!
No HDMI capable projector? Kanex allows you to connect an Apple TV to an older projector that doesn't have those slick HDMI inputs!
With a setup like above, one could try to use an iPad as a "mobile whiteboard"
What do you need for that?
Basically an App, that allows to draw/write/annotate/compose on the iPad, and later has options for sharing the content via the web, export as movie, pdf etc. Most Apps will allow you to record your actions on the iPad as well, ideal for creating flipped-classroom materials.
Some notable Apps:
Whiteboard: the basic (and free) one, you should have it installed!
ScreenChomp Education: free, and awesome! Records your actions easily
Zamurai: this one (pretty new) has a substantial amount of icons/objects/diagram structures etc. built-in. Basic = free, has InApp purchases
Doceri: this one is a professional one, and used the most by those who miss the actual 'real' interactive whiteboard in their classroom
Explain EveryThing: an excellent App, for much more than 'whiteboarding' only. Not free, but worth every penny. Is on all our iPads!
Tony Vincent made a pretty slick overview in a diagram, here is a link:

Of course, in this document we are missing the - recently announced - Google ChromeCast.
It basically is a smaller version of the Apple TV, see another post.
__________________________________________________________________________________
Now what if your School/Environment does not support/allow Airplay connections? (Some networks will not support this)
Then, if that is allowed :-), you could create your own network: take along an Airport Express (Apple) router, and you are set!
You could also try to connect via BlueTooth, for some that works pretty well.
Or, your phone (if you have an unlimited data plan) could be used to setup your own HotSpot network.
If you are willing to invest a small amount, you could opt for a device that
connects via WiFi (not Airplay), such as the Prijector (www.prijector.com)
This device creates a network itself. You need to be in a reasonable distance. (5 meters or so).
The advantage of Airplay: it is part of Bonjour, meaning it would work in the whole network,
and distance would not matter! You could connect from an iPad to anywhere in your network environment!
That way, one could easily create kiosk/bulletin board setups in a school.
Thursday, May 22, 2014
Chromecast - it never gets dull in Google land

The last blog was showing the Google Chromecast device.
Remember: it allows to wirelessly connect your Laptop to your TV (or projector/beamer).
So far, you only could show content that would play or load within the Google Chrome browser.
Well, you are not limited to your browser anymore! Here is a nice Google Chromecast update:
On the Google App store you can download the free app "VideoStream for Google".
This will allow you to play pretty much any video that lives on your computer.
The app gets very good ratings, so give it a try with your device!
Goodbye cables! Long live the couch . . .
Here is a direct download link

Thursday, May 15, 2014
Chromecast - serious competition to the Apple TV!


* Now available in Korea! * And it has been a long wait (for many!).
Small, light, and powerful. Got mine in the pocket since yesterday . . .
What can it do:
* Connect your Laptop (Mac or PC) wireless to any TV or big display (it just needs an HDMI connector)
and display anything that you can load in your Google Chrome browser.
Such as: YouTube videos, Flickr photos, a Google document, you get it.
It will support sound as well!
* Connect (now, this is really special!) you iPhone (or Android) wireless to the TV as well.
So far the YouTube App is supported.
This will not even drain or otherwise use your phone, you could just have it on standby as you watch!
Compared to the AppleTV:
Advantages:
A lot cheaper, and it only needs power from a USB connection (which your TV has!) - it does not need 220/110V cables
Much lighter, take it along on vacation, and turn dead hotel TV's into something useful!
Works just brilliant with a phone/iPad (and functions then also as a remote!)
Disadvantages:
Not so many Apps supported yet (e.g. you cannot display a video that you play with VLC/Apple MediaPlayer), meaning
so far it's a bit tight embedded in the Google environment. That is changing though. Netflix and a few others are supported already.

This little device can be used in a classroom setting as well, allowing anybody to quickly, wireless, connect to a projector
or display, so students (and teacher) can show whatever runs in their Chrome browser.
(Chadwick tip: is available in the new Lotte mart, in the hi-mart center basement, 49000 Won, US price = 35$)
You can read more here:
Monday, May 5, 2014
Google Drive and iPad - it never gets dull in the cloud
(if you are not, some of your students will!)

So far you had only 2 basic options:
- use a browser (such as Chrome) and use the 'desktop' version of Google drive (same as using your laptop)
- use the 'Drive' App on your iPad/Phone (and live with the limitations of cumbersome editing)
Google has changed it's philosophy, and now offers (3 so far) separate apps for accessing and working with
content in your drive from a mobile platform.

New: Google Drive to view
and
Google Sheets to edit
Google Docs to edit.
Are we there yet?
Nope, not completely. Of course, we will want to see an App for Google presentation slides (soon!)
and there are still significant differences between the mobile and desktop user experience.
Now, what are some of the improvements with this splitting of Apps?
Commenting:
Now possible, and one can see the workflow in all docs. (Add comments and resolve them)
Working off-line:
Hurrah. Typing and learning in the bus, on the beach, now possible!
Whenever one comes back into a wireless network, files and content will be synced again.
4-Digit passcode:
You can set (and it's recommended!) a 4-digit passcode to protect the contents of your Google Drive folder.
The code can be different on each device you own, giving you the option to - e.g. - secure a device that is also used by your children.
As comments suggest, Google is aiming here to compete better with it's close competitors
(Microsoft with Office 365 in the cloud, and Apple with iWork in iCloud). Separate apps can do
this better, hence the split up of the single Google Drive app.
Monday, April 28, 2014
An easy trick: How to get rid of unwanted mail messages in Google mail
While you can't currently block messages from specific addresses or domains, you can set up a filter to send those unwanted messages directly to Trash.
To set up a filter, follow these steps:
• Click the down arrow in your search box at the top of the page. A window that allows you to specify your search criteria will appear.
• Enter your search criteria. If you want to check that your search worked correctly, click the search button. Clicking the down arrow again will bring
the window back with the same search criteria you entered.
• Click Create filter with this search at the bottom of the search window.
• Choose the action you'd like for these messages by checking the appropriate box. (In this case, I suggest checking "Delete it.")
• Click Create Filter.
Happy filtering . . .
New Google Tips - great videos for key features to each product
As they state: "A fun way of poking around. New cards coming all the time, come back often!"
This is indeed a very nice website, where you can learn more about some features by poking the cards.
Enjoy

How to get rid of unwanted mail messages in Google mail
What to do with unwanted mail (that isn't necessarily spam):
While you can't currently block messages from specific addresses or domains, you can set up a filter to send those unwanted messages directly to Trash.To set up a filter, follow these steps:
• Click the down arrow in your search box at the top of the page. A window that allows you to specify your search criteria will appear.
• Enter your search criteria. If you want to check that your search worked correctly, click the search button. Clicking the down arrow again will bring
the window back with the same search criteria you entered.
• Click Create filter with this search at the bottom of the search window.
• Choose the action you'd like for these messages by checking the appropriate box. (In this case, I suggest checking "Delete it.")
• Click Create Filter.
Happy filtering . . .
New Statistics in EduBlogs
It gets better all the time! Since April 15 (that's where the statistics gathering started)


Edublogs shows - in an easy way - basic statistics about visitors to a/your blog.
If your students are Edubloggers, then you really should show them these slick visitor statistics.
Go to your dashboard, and select the statistics option (it's pretty new!)

It will show basic (clickable) info about your visitors in total:


And it provides info about views to single pages:

Great feature: Saving your Google Mail and documents from Google Drive
Good news!
It is now possible to save (a copy of) all your Chadwick Mail and Google drive data.
This is great, especially if you are leaving, and just want to keep a copy of all things. After downloading,
you will need to upload the data into a mail application on a laptop, and then you have the local
standard options (search, delete etc.). It can - if you choose - maintain your folder/label structure as well.
As you can see from the screenshot, you can download many other things as well.
Here are the steps involved:
Download a copy of your Gmail data (Mail, Drive data and even more):
Go to your Google account settings,
find and select Data Tools and continue to select the data you wish to save-keep.


Mail will be saved in the Mbox format, meaning you could open it easily with Apple Mail (on your laptop) or Outlook (for Windows).
Here is a link with more specific info
Google Drive Data question:
What is the difference with copying the files from Google drive
(when you sync your drive data from the cloud to your laptop, see screenshot below)?
The data download as described above, will give you readable documents on most platforms.
Meaning, Google Docs will be converted to docs you can read in MS Word, Pages or OpenOffice.
When you would copy the data from your synced Google drive, you maintain the Google document formats
(and that then again means, you can easily upload them again, into another account)
Bottom-line: An excellent new feature that Google offers here, and it might be a time saver for you.

Thursday, March 6, 2014
Easy blogging for kids with Easy Blogger Junior
❝ Easy Blogging for kids ❞ to Edublogs


Just discovered this - pretty amazing - App (for iPhone, or better iPad) that will make blogging for your young students very easy.
Instead of you doing the work, it's time to hand it over to the students themselves!
From PreK to . . . they will master this one with little to no extra help.
The App supports a shared iPad environment, an outstanding feature.
It was developed by 3 fathers/educators, and they have given it a lot of thought.
The best is to watch the short video that explains all features, you can find it at their homepage:

It will allow your students to pick their name from a gallery, and then they will be guided in simple steps towards creating a blog post.
The App supports pictures, movies and text.

Ready to go for it?
Here is the iTunes link: https://itunes.apple.com/us/app/easy-blog-jr/id716354615?mt=8
Wednesday, March 5, 2014
Publish EduBlog posts to your blog directly from your personal email account - possible now!
❝ Post by Mail ❞ to Edublogs
One of those outstanding features of Posterous was the fact that you could blog via E-Mail.
Wordpress has those possibilities, but Edublogs (we use the Campus setup) was lacking this possibility so far.
It requires the JetPack plugin activated.
After activation, you must connect (with any valid account) to Wordpress.com.
Then you can configure the settings. Posts will be formatted, and can contain image(s).

There are more options (other than Post by Mail) as you can see below. Connect to Facebook,
post directly to Twitter etc. Good stuff out there!

You might want to share this good news with your teachers (and students)!
Here is a quick tip: have a QR-code on your desk, that will send a mail to your Edu-Blogs mail account!
Saturday, February 8, 2014
Fix a slow Mac computer - best approach
Help: My Mac is getting slower, has delays, and has often a spinning beach-ball!
Ok, it's time for safe boot and a repair permissions act!

It is a useful tool for isolating problems & conflicts by putting OS X's startup volume in Safe mode. It will run your Mac with a minimum of extensions loaded, it performs basic checks and - best of all - it allows you to run Disk Utility in the most efficient way.
Why should I Repair Permissions?
File and folder permissions are crucial to your computer system. Well, one of the (few!) flaws of Unix-based systems is the fact that installing of software can mess-up those permissions, and that will result in your computer getting slower and slower.
This is the reason, why people sometime suggest to perform a 'complete new fresh install' of your whole Mac. This would bring all permissions back to default, and all will be fast again. Now, that would be a lot of work too! Well, Disk utility in Safe Mode will do a whole lot of special repairs, in a lot less time - and it's of sure the BEST thing you should try (before doing a complete new installation . . .)!
It wil fix things a lot, and you might experience a new fast Mac afterwards! And just so you know: running Disk Utility in Safe mode is more effective than running it just from your Mac in normal operation.
Ok, here are the steps:
1. For Safe Boot: restart your computer while holding the Shift key
2. Do not let go of the Shift key until your screen says Safe Boot
3. Once you see the screen with the words Safe Boot let go of the Shift key. Now login (as usual)
4. Open Disk Utility located in the Utility folder of your Applications folder
5. Select the main hard drive and have First Aid selected in the Disk Utility window
6. Select Repair Disk Permissions (do not select 'verify')

7. When Disk Utility is ready, you will see "Permissions repair complete". It might take a long while!
After this, you should restart your computer! And, hopefully, things will be better, as repairing the Disk Permissions in Safe Boot will take care of many problems.
Of course, check how full your harddisk is! Keep a minimum of 20% free (no kidding!). Your OS needs that space for swapping files and caches around. Also, use 'Activity Monitor' (in Utilities) to monitor what is going on under the hood. Keep an eye on the CPU loads and discover Memory eaters.
Last tip: having more than 10 Tabs open in (any) browser, will cost a lot of memory being used. The - fabulous - extension 'OneTab' can help you there, just download and use, you will not regret. Browser's little helper on the way! http://www.one-tab.com
Friday, January 24, 2014
Running Windows Explorer on your Mac
We all had that problem: a travel booking system, or a CD with medical images or . . . requires Windows and Internet Explorer.
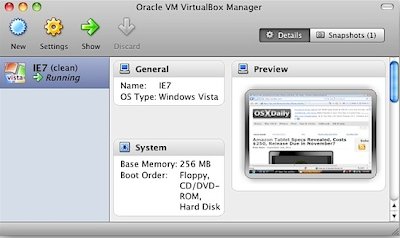
Screenshot: Starting Windows after installation of Virtualbox
Update: I just experienced some issues when installing the Windows XP with the terminal command on my Macbook with Maverick 10.9.1 (fresh installed, but that's another topic . . )
A bit of Googling revealed that Microsoft does offer "trial" versions of their OS to be used with virtualisation software. Here is the link: http://modern.ie/en-us/virtualization-tools#downloads
Grab the version of Windows that you prefer, download the compressed files (multiple parts) and then go from there. Windows 8 will run pretty slow, XP will be speedy, keep that in mind. Well, I am doing a download from this link right now :-)
You have several options on a Mac: installing Bootcamp with a paid version of Windows, or using virtualisation software such as VMware.
All do-able, but at a cost, and perhaps not so convenient for the very occasional need.
Well, there is a - free - option as well, and it uses a little trick. You will work with a 30-day 'trial' version of Windows, and after that period is over, you basically reset the trial back to a new start, and then you can go again . . .
Shows how to do all of this. Don't worry, it's pretty easy, and don't let the Terminal commands scare you off.
It takes a bit, but it will work fine. Virtualbox is free software (from the big Oracle), and although it's not a speed monster,
Windows XP with Explorer 7 (or 9) will work just fine.
The steps are:
1. download and install Virtualbox
2. download and install Windows via a terminal command
3. hah, there is no 3. Just be patient and then: Done! Just start it all up now, and go ahead!

Screenshot: The Terminal Window - downloading (and automatic) installation of Windows
Screenshot: The Terminal Window - downloading (and automatic) installation of Windows

Screenshot: Starting Windows after installation of Virtualbox
Update: I just experienced some issues when installing the Windows XP with the terminal command on my Macbook with Maverick 10.9.1 (fresh installed, but that's another topic . . )
A bit of Googling revealed that Microsoft does offer "trial" versions of their OS to be used with virtualisation software. Here is the link: http://modern.ie/en-us/virtualization-tools#downloads
Grab the version of Windows that you prefer, download the compressed files (multiple parts) and then go from there. Windows 8 will run pretty slow, XP will be speedy, keep that in mind. Well, I am doing a download from this link right now :-)
Great free Visual Art iBook resource
Need some ideas how to use iPads in the Art class room?
Come and grab an excellent, 41 pages free iBook at
https://itunes.apple.com/us/book/ipad-art/id706608032?mt=11written by Cathy Hunt, an ADE (Apple Distinguished Educator)
(she is on the web at: http://www.ipadartroom.com )
Highly recommend!


Subscribe to:
Posts (Atom)